Lightning Web Components - Testing
Happy New Year!
During the last post we explored some of the basics of developing with LWC. Now let’s see what options we have for testing.
I have to admit that I have never felt comfortable with front-end JavaScript testing on Salesforce. A few years ago I did a Dreamforce presentation on using Jasmine to test your Visualforce pages. The whole point was to lay the foundation of what was technically possible, but in practice it required so much setup and DOM mocking that it just never really caught on for my own day to day at work.
Once I started working with Aura, testing felt even more out of reach. How do I test each JavaScipt controller method? How would I mock out server calls? Did I have to make make a lightning application just for the purpose of running tests on components? With all these questions and doubts, I instead chose to ignore front-end testing all together.
To be clear, I am a huge proponent of test driven development and I generally dislike making any changes to code without tests to help me confirm that nothing else broke along the way. But when you are crunched for time, these things just sort of get push aside for later. Surely someone smarter than me will figure this out, right? This is one of the rare occassions where my procrastination actually paid off.
Enter lwc-jest
Jest is a JavaScript testing framework created by Facebook. lwc-jest is Salesforce’s extension of this framework to support testing Lightning Web Components. I have to commend the LWC team for continuing down this path of using existing, proven technologies, as well for making lwc-jest open source. This again has made it easy for me to find answers to my questions while troubleshooting my code.
On top of that, this testing framework works from the command line and runs entirely on your local machine. That’s right, Salesforce development all from the comfort of your computer. No WiFi? No problem! You can’t view your component in your browser locally (at least, not that I know of), but you can code and run your tests without even authenticating with a scratch org or sandbox.
For those of you playing along at home, here are some resources to help you follow along:
Lesson 1: Machine setup is tricky on Windows
Salesforce’s documentation does a fantastic job on setting up Jest on your machine. That is, if you’re using a Mac, where everything worked fairly seemlessly. I tried this on a Windows machine and ran into some issues along the way. To be fair, I am not very experienced with Node.js so a lot of these problems could just be a result of my inexperience and just issues with running Node on a Windows machine.
I got to the step where I was running npm install in Command Prompt and receive this error:
gyp ERR! configure error
gyp ERR! stack Error: Can't find Python executable "python", you can set the PYTHON env variable
Ok, so clearly I need to install python. I installed python3 and set the env variable on my machine and tried again. That threw a python syntax error. I wish I saved the error, but in the end it turns out I needed to use python2 instead of python3. This wasn’t a problem on my Mac because python2 is installed by default.
I tried again and ran into another error along the lines of needing .NET Framework 2.0 SDK installed, which I could resolve by installing Visual Studio. I tried that and the error didn’t go away. This was a couple hours into this and while the issue was probably due to something I was or was not doing, I couldn’t help but wonder if the package itself just had Windows issues that were beyond me. Either way, I gave up and tried again using Windows Subsystem for Linux (WSL), which I already had set up on my machine.
Setup worked out fine once I switched to WSL, but there were still some issues. Sometimes tests would fail and then suddenly pass when run again. This didn’t seem to happen on my Mac. Also, the tests ran about 4 times faster on my Mac, though that could be because I’m running the tests in WSL instead of native Linux. The difference was about 5 seconds on a Mac compared to 20 seconds on Windows. This is still blazingly fast compared to some Apex tests, but it was still consistently noticeable.
I hit a few bumps along the way, but I’m happy that Jest was working and I could get to fun part of writing tests.
Lesson 2: What am I testing again?
Before I jumped in, I had to wrap my head around front-end testing. Apex testing comes fairly naturally to me now: set up your expected data, call the methods with your inputs, does this method do what I expect it to? Does this flow do what I expect it to? I don’t know why this never translated well for me when it came to front-end testing. An application could do so much, what was necessary for testing? Do I need to assert on pixels in the margins? That tags had the appropriate class names? This analysis paralysis usually led to inaction with me just settling with “I’ve clicked through the front-end, I’m sure it’s fine”.
Since LWC is component based, this was a little easier to digest. Components tend to do fairly discrete things and if they don’t maybe the component is doing too much. lwc-jest made isolating your tests even easier since it allowed you to render a component by itself, call its methods, and interact with its public properties.
With this modularization in mind, I came to the conclusion that I should test what I can access in the test, coming up with the following essentials:
- Does the component display the tags and data you want to display?
- Does the component respond to interactions as expected?
- Does the component’s public methods and properties (i.e. those with the
@apidecorator) work as expected?
You can always test more later, but I consider these the MVP of your tests. In the tests for the inputTableCell component, I focus just on that:
- Are the passed in
@apidecorated properties fornameandrecordused to display the correct data properly? - Is the
lightning-inputelement present? - Does the
@apidecorated methodinputValue()return the correct data after you input data?
beforeEach(() => {
    element = createElement('c-input-table-cell', { is: InputTableCell });
    element.record = { 'Name' : 'Test Name'};
    element.field = 'Name';
    document.body.appendChild(element);

    lwcInput = element.shadowRoot.querySelector('lightning-input');
});

describe('Input table cell', () => {
    it('should have the correct label and name', () => {
        expect(lwcInput.label).toBe('Name');
        expect(lwcInput.name).toBe('Name');
    });

    it('displays an input field', () => {
        expect(lwcInput.value).toBe('Test Name');
    });

    it('returns inputted values', () => {
        const expectedName = 'Updated Name'
        lwcInput.value = expectedName;
        const typeEvent = new Event('change');
        lwcInput.dispatchEvent(typeEvent);

        const inputValue = element.inputValue();
        expect(inputValue.value).toBe(expectedName);
        expect(inputValue.field).toBe('Name');
    })
});
I really like this testing format. The describe methods create easy to read documentation as to what this component does without having to hijack method names like I do in Apex (e.g. @isTest private static void shouldReturnInputValueWhenChanged())
Lesson 3: Get good at query selectors and events
In Jest, you are working with a simulated DOM as if you were in the browser. In other words, the tests don’t actually render the page, at least, not in a way that you can look at and interact with it. You will need to write JavaScript query selectors in order to assert on whether or not they present. You’ll also have to fire off your own Events when you interact with your component. For example, let’s take the input from inputTableCell:
<lightning-input variant="label-hidden" label={field} name={field} value={value} onchange={handleInputChange}></lightning-input>
When the input is changed, handleInputChange() should be called, which in turn updates the value returned by the public method inputValue(). In my test, I initially tried the following:
it('returns inputted values', () => {
    const expectedName = 'Updated Name'
    lwcInput.value = expectedName;

    const inputValue = element.inputValue();
    expect(inputValue.value).toBe(expectedName);
})
This didn’t work because updating the value on the element doesn’t actually fire the change event. You need to do that yourself like so:
const typeEvent = new Event('change');
lwcInput.dispatchEvent(typeEvent);
Again, standards come to rescue as I was easily able to find this documented online.
However, whenever my tests failed I couldn’t help but wonder if I had just written an Event or a query selector incorrectly. At first I was just running my tests over and over again, but once I figured out how to use the interactive debugger, I was able to save myself some time.
Lesson 4: Use the debugger to interact with your code during execution
If you run your tests using the debug flag (i.e. lwc-jest --debug), tests will actually stop at breakpoints in your code so you can interact with the code in that context. For example, I placed a random debugger in my tests:
it('should have the correct label and name', () => {
    console.log('here');
    debugger;
    expect(lwcInput.label).toBe('Name');
    expect(lwcInput.name).toBe('Name');
});
To interact with the debugger, in Chrome go to chrome://inspect and click “Open dedicated DevTools for Node”

When you run your tests the debugger will freeze once, indicating tests are ready to run. Press the play button and the debugger will eventually freeze again at your breakpoint, where you can interact with the variables in that context. (This may take some time based on how fast your tests run)
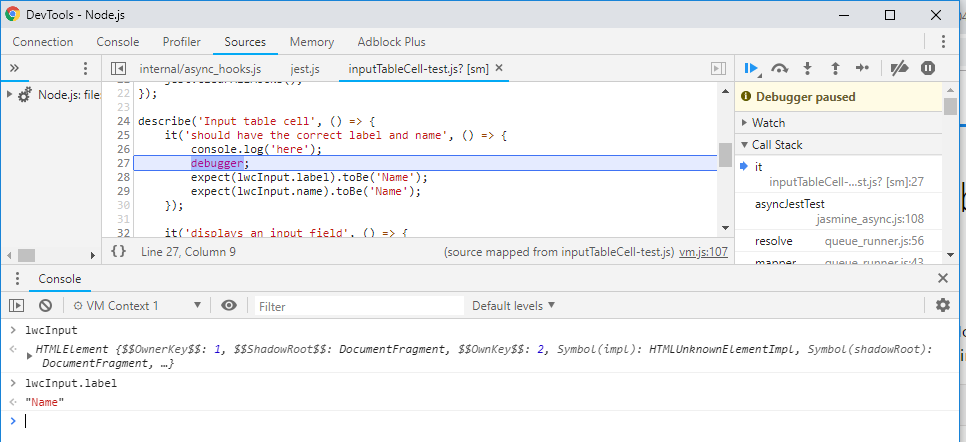
You’ll notice that nothing is rendered in the browser, you just have the console to work with. This was particularly useful for testing query selectors to see if you are writing them correctly, as well as trying to figure out what is rendered on the page in general without being able to look at it. This became especially useful when doing integration tests with components that were composed of other components.
Lesson 5: Components are only rendered one level deep
The highest level component in my project was demoComposition, which contains two multiEditTable components, which each contain inputTableCell. During my test of demoComposition, I was trying to interact with the inputs rendered by inputTableCell, but the inputs just weren’t there.
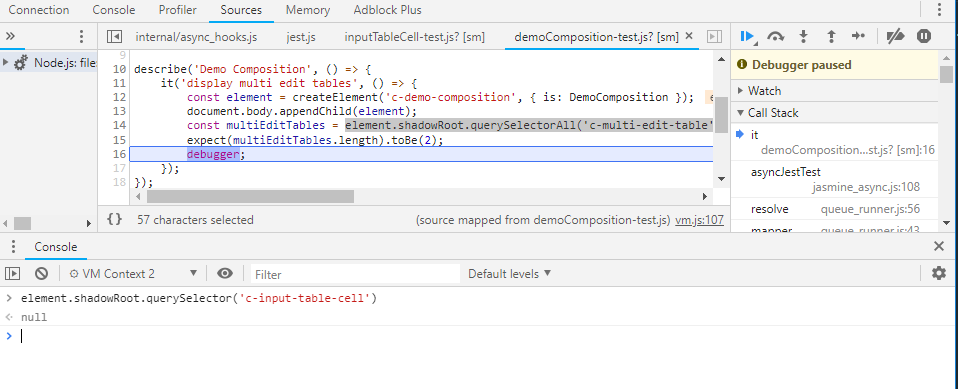
I might be missing something, but this Stack Overflow post seems to indicate there this is some kind of “shallow” rendering mode and there is some way to render all of the components. I didn’t figure it out, so I left it at just testing that the top level components are rendered. This was a shame since I couldn’t try out testing the interaction with the Apex controller. This is something I would like to dig into more to see what options I have in terms of rendering more of the hierarchy, or even just mocking out the child components.
Conclusions
There is still a lot more to explore with LWC. For example, I’d like to do more with the @wire decorator and mixing aura components with LWC. But while there a still some kinks to work out, I am very excited to start adding LWC to production applications. Not only will this open up Salesforce platform development to more traditional JavaScript developers, but it also makes front-end development much more of a joy for those us already in the system. The tools provided with LWC will help automate some of the simpler front-end QA that we usually manually perform, help developers make front-end changes with more confidence that they aren’t causing unexpected bugs, and lead to generally cleaner and more modular code. I encourage every Salesforce developer to give Lightning Web Components a try and I would love to see what the community is making so feel free to shoot me an email or a tweet to share some code.